Furality Ultra booth video: behind the scenes
The video I made for my Furality Ultra booth was a lot of work, and I’d love to walk folks through the process!
The assumption some people have is that I got a whole bunch of people together to perform in sync, but that is absolutely not the case. Instead, every single critter, and many of the visual props you see, are on their own separate chromakeyed layer, composited using DaVinci Resolve, each one acted by me personally.
I had learned a lot of lessons from the video I produced for Furality Somna; for that one I just recorded a simple looping scene with a fixed camera, and played every single character in it, and again composited everything in DaVinci. I ended up making it all up as I went along, which was fun but also added about 3x as much work as it normally would have taken, and this year’s video being much more ambitious I knew I needed to do way more planning for it to come out well.
(The music in last year’s video, incidentally, is a lo-fi version of Material Change.)
Here is a video showing some of the stuff that I’ll be describing in further detail:
Music production

I wrote and recorded the song up-front, and used that to plan the visuals as I figured out which musical genres to use. Some of it I had planned out ahead of time but some of it I figured out what made the most sense while I was recording the music. As usual I produced the music in Logic Pro, and I made heavy use of the folder stack functionality to keep my project organized. Each genre was recorded on its own separate set of tracks contained within a folder stack.
I did end up making some changes to the music during production. The jazz segment in particular changed a few times, both to improve the lyrics and the vocal delivery.
I went with a tempo of 128BPM, because the video is one minute long and there were exactly 128 beats in it. Sometimes you don’t have to overthink it.
Locations
After getting the music arranged, I wrote up a simple shooting script to plan out the scenes, and did a lot of location scouting to find places that would work well. My main criteria were:
- It needs to have decent performance (so I could record at a steady framerate)
- It needs to be possible to turn off post-processing (so that it doesn’t interfere with VRChat’s stream camera green screen)
- It needs to be somewhere that’s recognizable to folks who are in my orbit
The locations I ended up choosing were:
- Community Open Mic (pop)
- Piano Lounge Freude (jazz)
- Trans Academy (choral)
The first two are venues I’ve performed at many times, and Trans Academy is an organization I volunteer for so it’s special to me.
Originally I was going to record the first segment in Transitions Club, where I’ve also performed many times, but unfortunately there’s no way to turn off the camera postprocessing there, which I only realized after doing a test recording and discovering that it affects the green screen.
Avatars
All of the avatars I used were my own; in particular, I made several versions of my standard critter base with different instrument setups, and also a specific drummer version of the Critter Junction resident base.
The guitar, electric bass, keyboard, and drum sticks were my own models. I also modified the following meshes (all of which are free to use in this way):
- Instruments: Violin / Piano / Double Bass by Tom Zimmermann (for the violin, viola, and double bass)
- Cello by VM-Models
- Drum Set by zaurian868
- Violin bow by CharlotteMeehan
All of these were extensively modified for my purposes (particularly to make them VRChat-compatible).
I also created a simple green screen avatar for part of the compositing workflow.
Recording layers
VRChat has a camera dolly system which allows you to set up and replay a camera path, but it doesn’t provide any real built-in synchronization mechanism. To keep things in sync, I did the following:
- Created a basic lead-in click track (I used Audacity for this, but any music software will do)
- Split the music into sections for filming
- Downloaded sendosc to trigger the dolly camera
- Wrote a basic Powershell script to synchronize everything up
$click = New-Object System.Media.SoundPlayer 'click.wav'
$player = New-Object System.Media.SoundPlayer $args[0]

.\sendosc.exe localhost 9000 /dolly/Play b false

echo "Playing click"
$click.Play()

Start-Sleep -Milliseconds 5000

echo "starting dollycam"
.\sendosc.exe localhost 9000 /dolly/Play b true

Start-Sleep -Milliseconds 1000

echo "Playing song"
$player.Play()

Start-Sleep -Milliseconds 16000
In order to film a pass, I would then invoke the script with a command like:
powershell -ExecutionPolicy Bypass -File play.ps1 ".\1 pop.wav"
I kept a single powershell instance open in the foreground so I could just press up and enter every time I wanted to film a take, which was quite often.
Anyway. This script will play the click track for five seconds, then starts the camera dolly path, then one second later starts the music playing, so that I could then perform my choreography in sync with the audio track.
I did several takes of each layer, and also kept an eye out for obvious rendering hitches during it, since those often cause the camera path to fall out of sync and cause other visual artifacts in the composite. Unfortunately, VRChat’s dolly system is a bit limited when it comes to synchronization.
As far as synchronizing things in the timeline go, I found that there were 21 frames of latency between the display capture and the audio output capture from my headphones, and I used the click track to line the clips up in the composite.

Dolly management
I made heavy use of DollyManager to manage my camera paths, which was super useful whenever I had to do reshoots (which was often). Unfortunately, Camera Dolly does not store a bunch of settings when you export so I still had to make notes of a lot of things. And also it does store a bunch of settings that you don’t actually want it to store, such as the green screen color. And the in-game editor is kind of a nightmare to actually use, especially for keyframes that are out of reach.
Basically, the camera dolly as it stands right now is kinda half-baked. Hopefully VRChat improves it over time.
Dealing with in-world props
Most in-world props do not appear on the green screen, which is why I created the green screen avatar to mask those out. For those render passes I disabled the camera green screen, and stood behind the prop while recording another pass. This usually required a lot of extra work to make a clean plate in DaVinci, but it was worth it.
The rock/pop scene
This scene I ended up redoing multiple times while I figured out the workflow. Fortunately it was the simplest of the composited scenes, so it was well worth the time spent experimenting so I could make the later scenes go more smoothly.
There are “only” seven layers in this composite:
- Background
- Drummer
- Drum kit (world prop)
- Backup vocalist
- Bass player
- Lead critter
- Microphone (world prop)
I recorded this in three separate shots each with their own camera path; I ended up only using two of the shots.
During the first shot with the sweeping camera pan I had to do multiple cuts within the layers to change their ordering, which you can kind of see in the timeline:

I added a bit of blur to the background layer, mostly to hide some annoying aliasing artifacts from the render since I had antialiasing disabled in VRChat to get the maximum possible framerate. Lens blur hides many sins.
The studio scene
For the scene where I’m in the studio I just found a world where there was a chair I could sit on, disabled fullbody tracking (so that the chair would work right), and lined myself up over a photo of my actual messy studio. Pretty straightforward. In the composite I added some extra thick cartoon outline and some film grain to make things match a bit better. I also spent way too much time figuring out how to post-process a shadow onto the seat cushion, which mostly got covered up by the speech bubble. Oh well, it was a good learning experience.


Incidentally, I am not singing along with the lyrics there, and instead am saying “Why isn’t this working?!” which is a common utterance from me whenever Logic is misbehaving.
The pixel art scene
This was another super-complicated composite. DaVinci doesn’t really have any good way of doing pixel-precise positioning or scaling, so what I ended up doing here was to draw every layer at 320x180 with things lined up how I wanted them in the frame, then scaled those layers up 6x with nearest-neighbor filtering (using ImageMagick) and then did the composite in DaVinci.
The note lanes for the rhythm game in the background were just drawn as sprite layers which I moved in sync to the music, and I did a Fusion composition to extract the few rows of pixels where those notes hit the bottom edge of the controller sprites and then applied a ridiculous glow with a directional blur to them.
The bouncing coin is something I quickly modeled and rendered in Blender as a 6-frame sequence. I looped that sequence in DaVinci and then gave it a simple motion path, synchronized with the beat.
Each of the performers was multiple layers, typically a base sprite, a sprite for the instrument, and any additional sprites for hand positions (which I moved in 6-pixel increments using “step” interpolation) and so on. The falling sprites were done separately, of course.
When the entire stage falls apart, I just applied some simple motion paths to them and went with what felt right, rather than anything physically accurate (but it was fun to make the trellis bounce off the floor, a decision I came up with on the spot).
The main composite is around 20 layers, and many of those layers are also compound clips with 3-4 layers of their own. There’s a lot going on. Watch it a bunch of times!
The cartoon critter head
That was all just traditional hand animation! I made a layer for the head, the blinking eyes, and a bunch of mouth shapes, and then I did the usual thing one does. Resolve, incidentally, is not particularly great for animating this way, but it worked well enough. For a longer animation I’d definitely want to use something else though.
The best thing that came out of this was when I was drawing the base layer and doing a symmetry check:

The big grid of games and videos and such
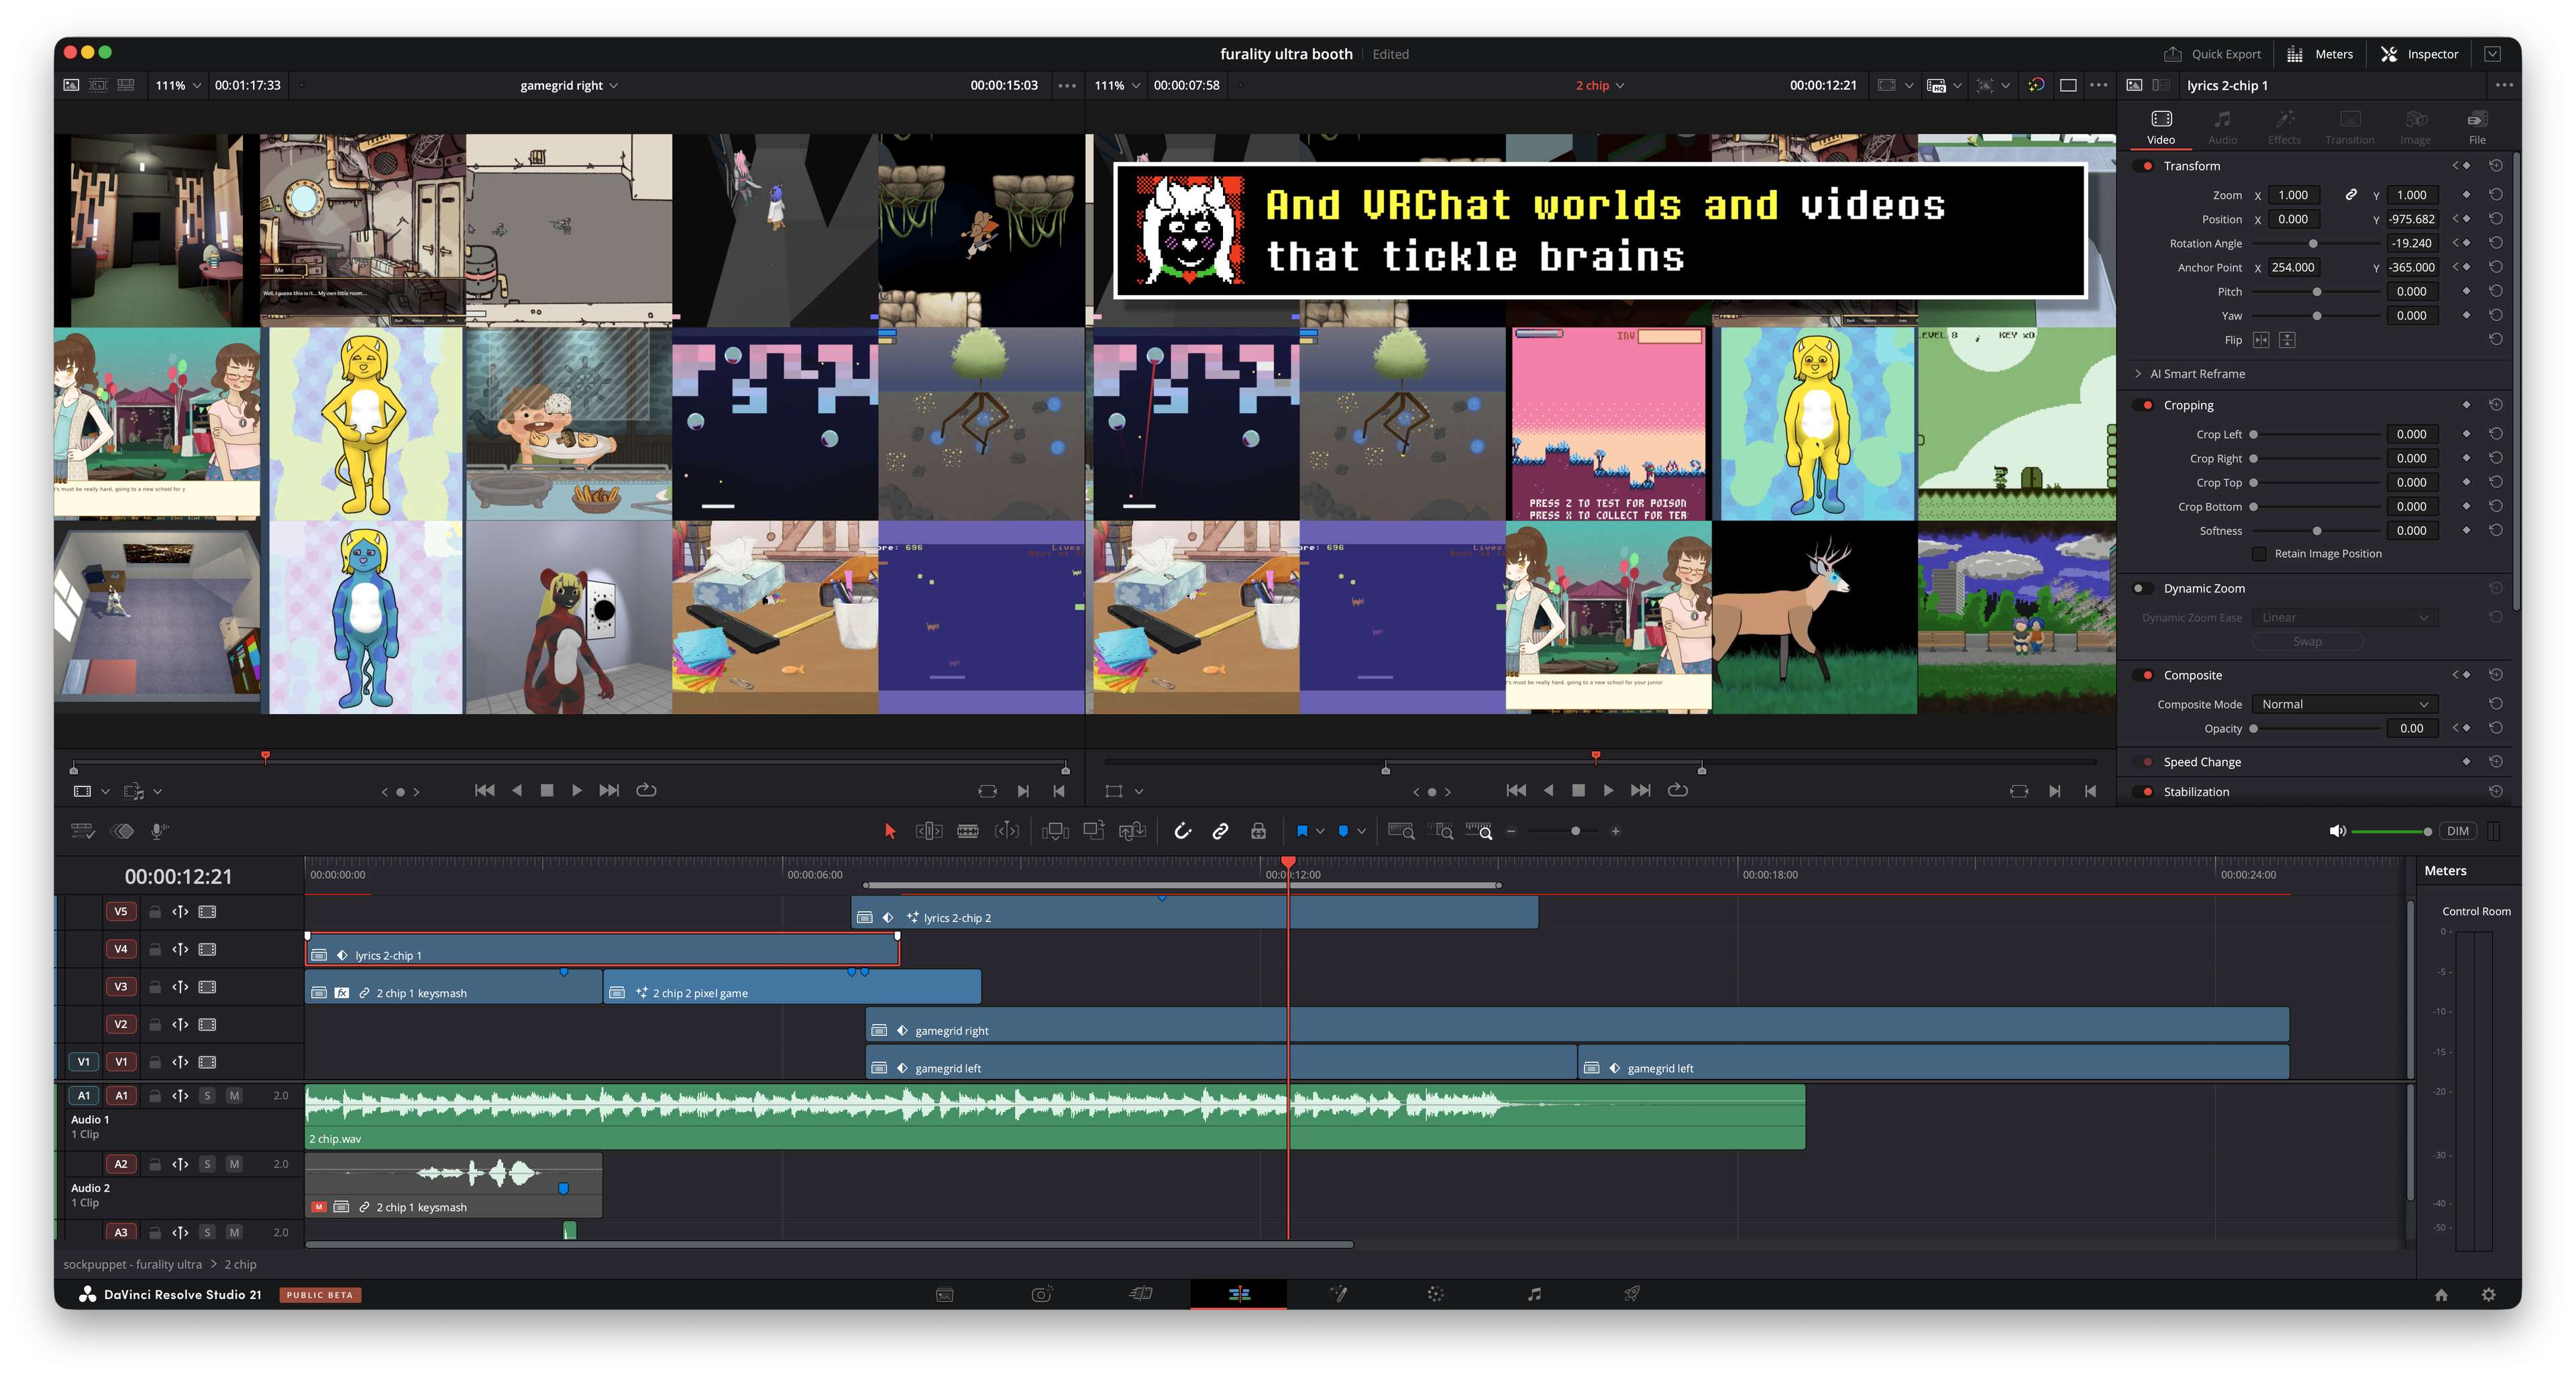
The Undertale-style critter sprite was a modified version of the one I drew for the Undertale memories microsite that went up for the 10th anniversary of Undertale’s release.
The footage all came from things I’ve worked on. Most of it was games I composed for:
- Ass Without a Trace 2 by HoggTied (NSFW)
- Psycho Burst and Airship Chef by Yamatsu (both NSFW)
- Snack Stacker by Mitha
- Pawmune by SundewBry
- Treestoration by rtwfroody
- Currying Flavors by chinniedraws
- Magnolia’s Early Morning Walk by Definitely a Fox (NSFW-ish)
- The Balance of Sappho by The Firecrackers
- Hallowed Grounds by Paxton
- The Herbal Spice Problem by Glass Dragon Studios
- Admiralo Island Witches Club by cloverfirefly
- Brickris Tetout by Bamboy
- Elevate by Kamil Bazydlo
- Haggle Waggle: Duck & Doge by z0lly
- Spooky Sushi by Spectronaut
- Refactor, Colorful Critter1, and CATcher by fluffy (that’s me!)
But I also included two of the sillier videos from my random crap channel:
- jukka wins it all
- critter dance (a test of my customized Winterpaw rodent avatar)
To actually animate the grid I just made two compound clips, each with its own 5x3 grid of cropped videos, and then scrolled each one across the screen. For most of the videos (which were 16:9) I could size and position them consistently by zooming them to 0.3333 and giving them a left/right crop of 384 (to make their effective resolution 1152×1080, the horizontal resolution being 1920×3/5, trust me this all makes sense mathematically). Horizontal positioning was in multiples of 384 (1920/5), and vertical was in 360 (1080/3). There were a couple of non-16:9 videos which I also had to deal with separately, but it was basically the same process, just with different numbers.
The jazz club scene
There wasn’t anything particularly different from this vs. the rock/pop scene, but in this case I recorded the background and microphone plates with postprocessing enabled, since Piano Lounge Freude’s lighting is all done in the postprocessing step. For the microphone I was able to clean up the postprocessing glow well enough, mostly using the “despill” function built-in to 3D Keyer.
Oddly enough, the stage mic in Piano Lounge Freude does appear on the VRC stream camera’s green screen, somehow. I assume there’s some specific render tag set on the object. As a result it appeared in my avatar video layer. However, it was still good to have the properly-lit microphone to composite on top to improve the look. To account for the postprocessing-based lighting I used DaVinci’s color grading to make the avatars look appropriately-lit in the composite.
On the background I was originally thinking of using a green screen and then tracking it to put some of my other random videos in the space, but I decided that would have been too much work and also too visually-busy, so instead I made a quick-and-dirty plaid background video to run in a loop and then composited in the one shot from last year’s video more traditionally.
The choral scene

The choral scene was a nightmare to record and composite; in my Resolve project this clip eventually got the name “the shot from hell.” The final composite had around 35 layers! These are due to the following:
- There are 16 critters (11 in the choir, 4 in the string quartet, and the conductor)
- Because of the sweeping camera motion I needed to change the composite order of many of the critters in places and it was easier to do that in additional layers
- Because the critters are partially obscured by the fountain I needed to make a greenscreened traveling matte of it
- And of course the website that appears in the background is another layer

If you step through that scene frame-by-frame you will possibly notice some things sliding around a little weirdly, because VRChat’s framerate is also not in sync with OBS’s. I had OBS recording at 60 FPS, and VRChat generally renders at 75 FPS on my system, so it was the luck of the draw as to whether the frame timing would perfectly line up. Fortunately it’s Good Enough. In future projects I will definitely try running my headset at 90 FPS to see if that helps any.
There were also some movements that fell out of sync due to render hitches, and for those I mostly fixed them in post by adding additional motion pathing to the layers. I didn’t get them all. There’s also a visual quirk in how the cellist’s tail hangs through the floor but remains visible. Ideally I’d have added a floor collider to the avatar to prevent this, but perfect is the enemy of done, and you probably didn’t notice those issues until you read this text.
Some chromakey tips
Most of the chromakeying was just using DaVinci’s basic “3D Keyer” chromakey. In some spots I had to mask some things in separately from how I masked them out, because of color clashes between avatar parts and the key color. (This was especially problematic for my main critter’s colorcycling-rainbow material, as well as my collar which is green in most forms.)
In a couple of spots I did find it useful to use “magic mask” as a pre-filter for 3D Keyer, but most of the time it was much easier to just do combinations of 3D Keyer and use its built-in garbage matte.
Also, while you can change the green screen color in the VRChat camera, you have to remember to set it up before you set up a camera path, or edit the saved path JSON. Fortunately, VRChat’s green screen is a single solid color with precise values so you can generally get away with having a green object on a green background as long as you set the key mode to “tight,” although some of the mask refinements will still require extra work.
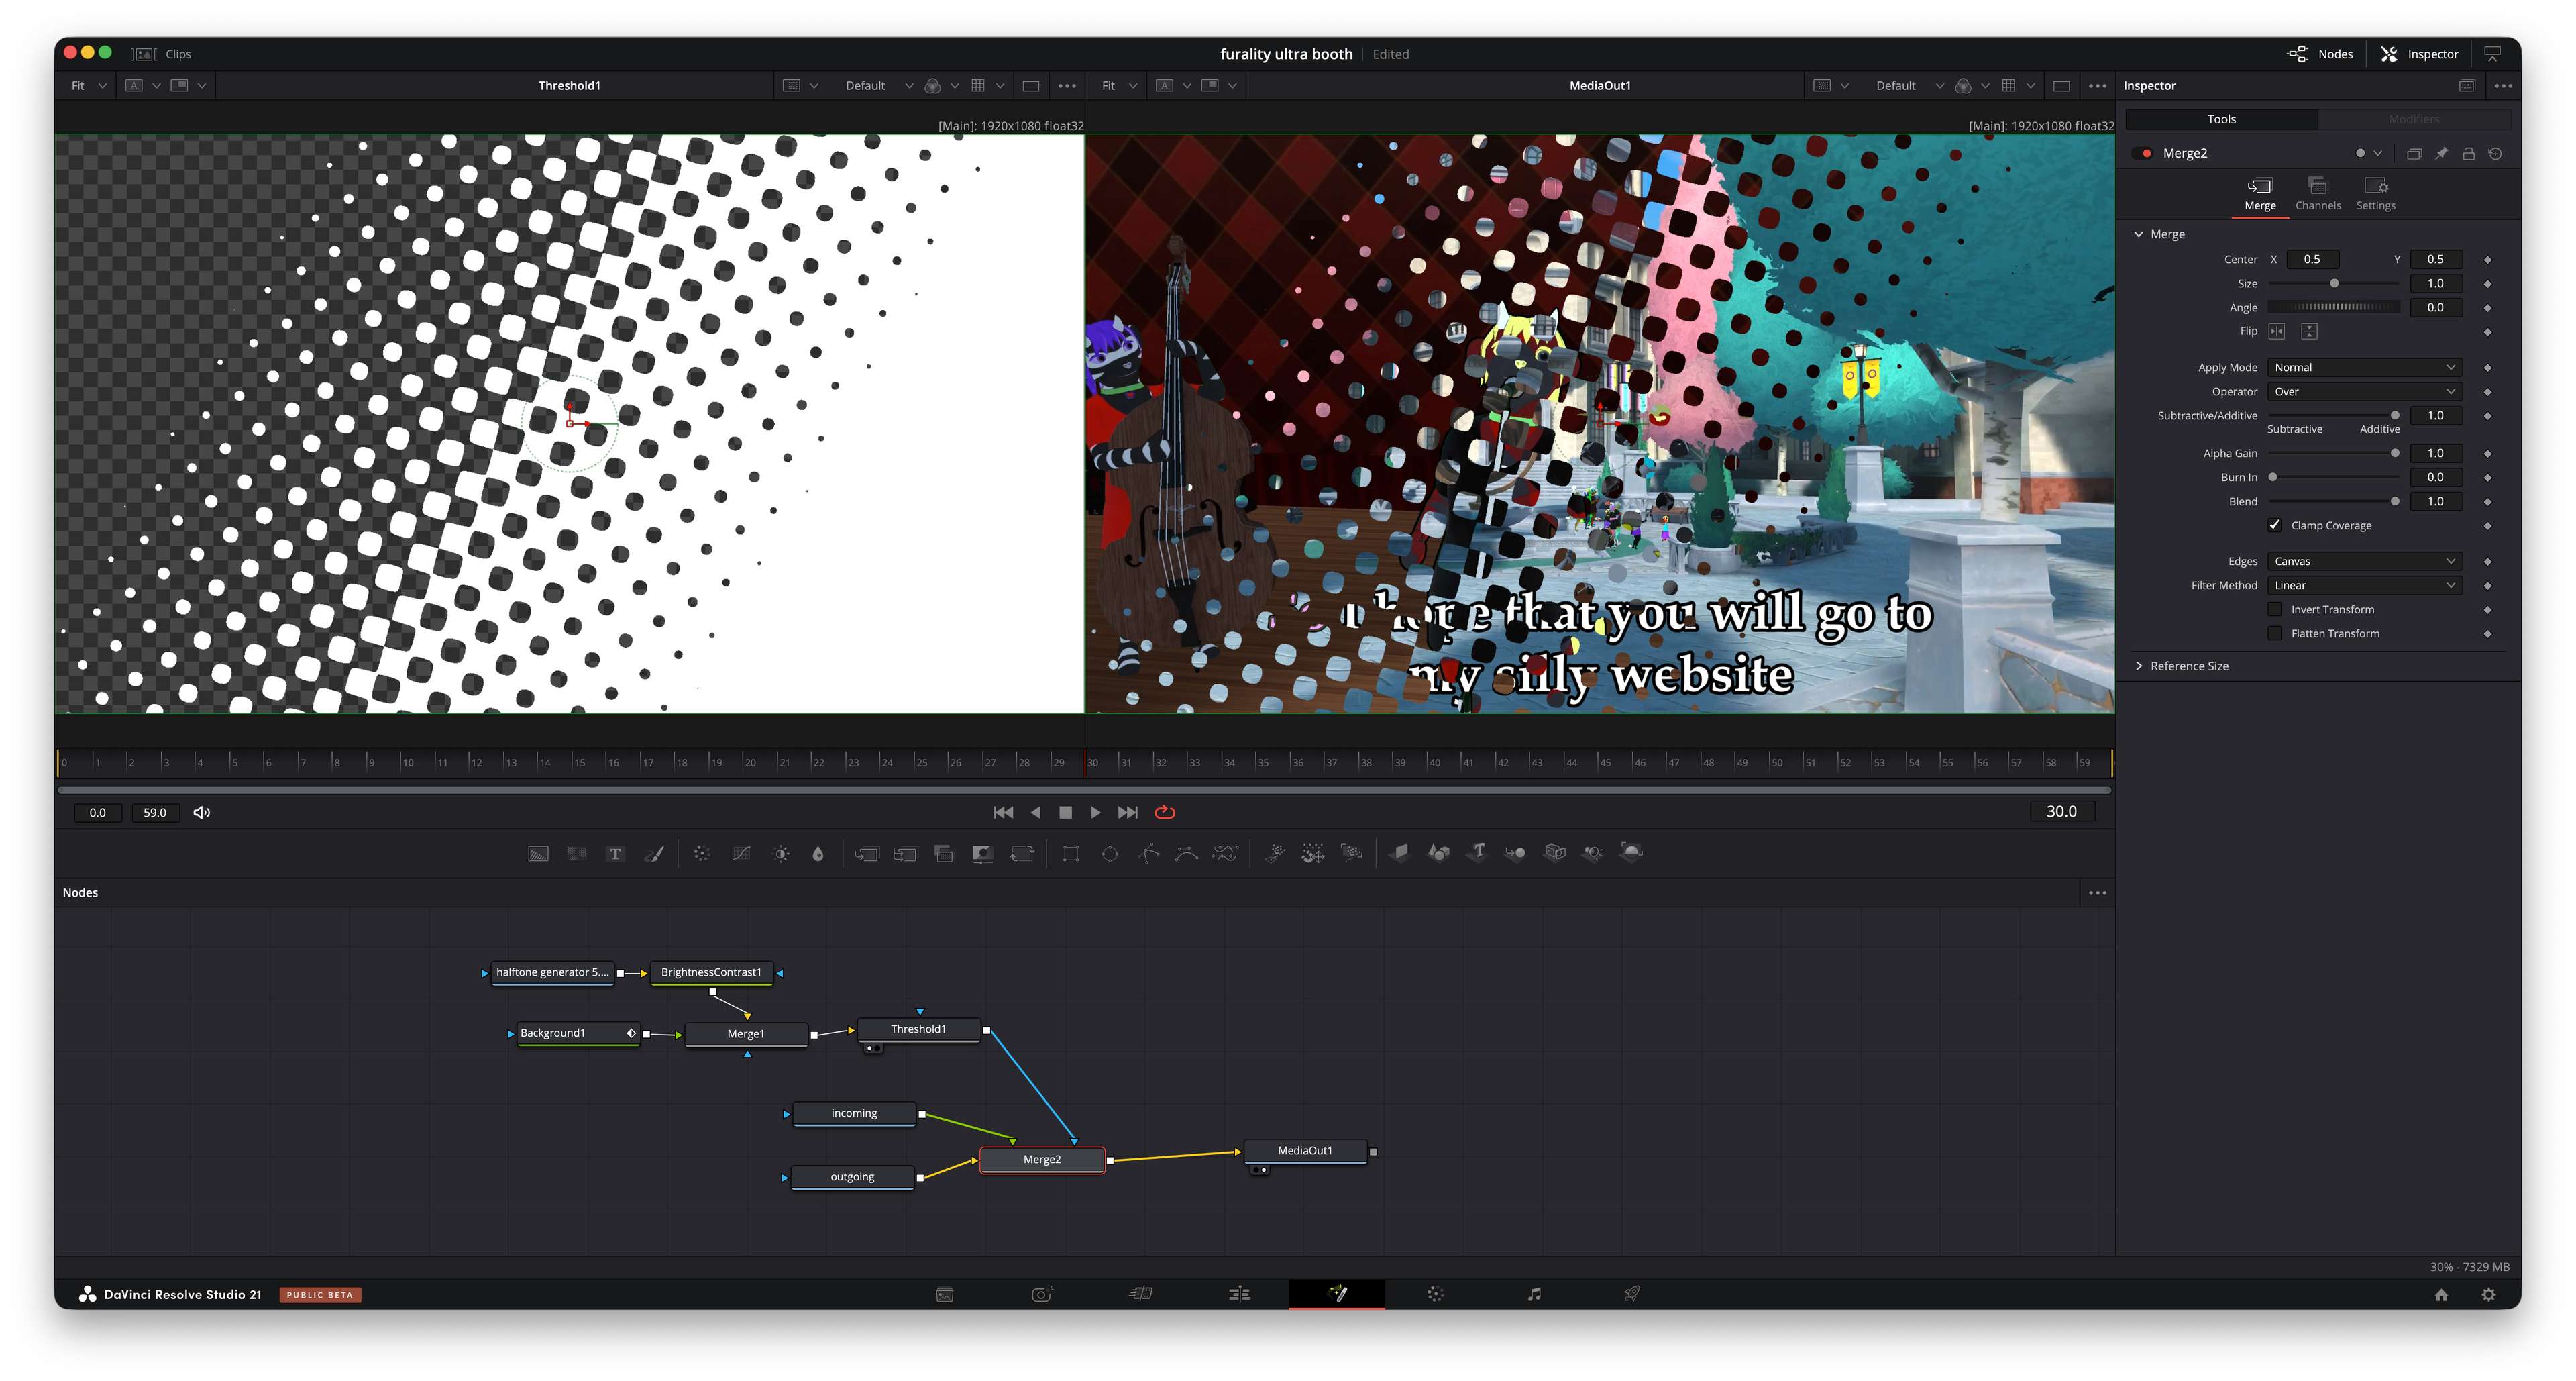
That halftone wipe transition
DaVinci doesn’t have a built-in halftone wipe or any sort of built-in halftone functionality at all, so I had to roll it myself. I approached it from a graphics programming perspective. You can think of a halftone as being similar to an ordered pattern dither, where the threshold pattern is given by:
\[ u = k(x\cos\theta - y\sin\theta) \\ v = k(x\sin\theta + y\cos\theta) \\ t = (\sin u + \sin v + 2)/4 \]
So, what I did for this was to generate a halftone screen function (I used a procedural texture in Affinity Photo for this but I could have probably figured out a way to do it all in DaVinci) and then merged it with a gradient with an additive blend, then applied a threshold filter to that, then used the resulting image as the blend mask to overlay the incoming clip over the outgoing clip. Animating the gradient’s start and end points to sweep across the frame generated the wipe transition. Easy.
(Someday I will release this as a template for others to use, because it’s a really cool effect!)
Some basic statistics
- Amount of raw footage recorded: 5 hours, 36 minutes and 25 seconds
- Amount of time spent working on the music: around 14 hours, apparently (it sure didn’t feel like that long though)
- Amount of time spent editing video: I have no idea because it turns out Time Sink wasn’t running on my editing computer this whole time, oops, but I’d estimate probably 40-60 hours?
So this video took around 70-80 hours of work altogether. If someone wanted to hire me to make something like this it would probably cost around $5000 at a highly-discounted rate, or $8000 if I actually valued my time, which I clearly do not. Hopefully I get at least $5000 in music sales out of this. (Mirlo and Bandcamp are probably the best choices for that.)